Sometimes when you plug in an external hard drive in your Mac, the icon for the HDD (hard drive) won’t show up, as if your computer doesn’t recognize it. This happened to me recently when I wanted to make a Time Machine backup on a My Password external HDD.
As soon as I clicked the Use Disk button inside the Time Machine dashboard, my external HDD got disconnected, and I got a weird unknown error message.
Fortunately, the fix was simple.
The following should work for you regardless of why your Mac doesn’t detect or stops detecting your external HDD.
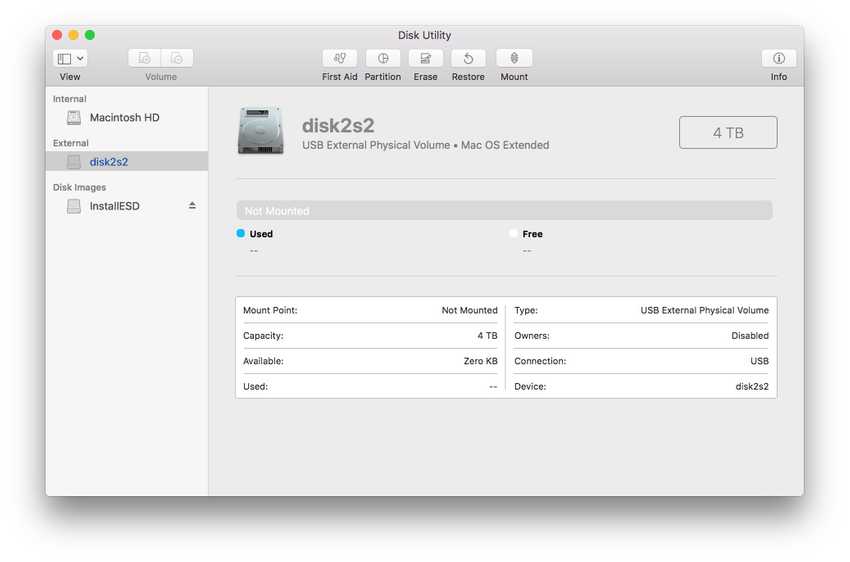
To make your Mac detect your hard drive again, go to System Preferences > Disk Utility.
Here on the left side, you should see the name of your external HDD under the External label.

Don’t worry if it says something like disk2s2, like it does in the screenshot above. The real name will be displayed once you started doing something with it.
Click on it, to select it.
Now you have some options, depending on what you need to do with your HDD
- First Aid: is your HDD giving you weird errors or acting unstable? First Aid will scan through your drive and fix potential issues — if it can.
- Partition: do you need to change the structure of your HDD, e.g. setting up multiple storage Volumes on the same HDD?
- Erase: do you need to wipe your HDD clean?
- Restore: do you need to restore your HDD to a previous state?
- Mount: does your external HDD have content you need to access right now? Click on Mount. If your HDD is working properly, you should now see the HDD launch icon reappear on your desktop, as it normally would.
Only relevant for Time Machine back-ups:
If you’re going to use your external HDD to back up your internal HDD using Time Machine, you’ll need to use an empty HDD (no data on it).
In that case, make sure there’s nothing on your external HDD that you can’t afford to lose, and then click on the Erase tab. In here, you can choose different formatting methods.
For Time Machine backups, use Mac OS Extended (journaled) or Mac OS Extended (journaled, Encrypted) if you want to add password protection. Then hit the Erase button.
It usually takes less than 2 minutes. Now it should be ready to use for a Time Machine back up.
Check out this tutorial to learn how to use Time Machine.